I’ve been working on a project recently, and it may come across as counter-intuitive, but it has involved creating a Puppet environment in AWS. This is a bit different to the way I would normally work with an AWS deployment, but the future of the project will end up being onsite as well as cloud, and involves Windows as well as Linux. The customer manages these as long life servers rather than a distinct dynamic environment.

In either case this was a large greenfield project with the endgame being a continuous delivery system for a middleware stack. If I was to do a blog on the entire thing, it would probably take 4 months to complete (Though this blog entry has taken that long anyway). So I have pulled out a short interesting part.

An existing Puppet Environment

I’m not going to go into the setup of a Puppet server, that’s for another time, so we are going to base the examples on the fact an existing Puppet Enterprise server exists and DNS works, and we do have a Puppet control-repo correctly configured. This can work with the Puppet Open Source server as well.

Now what we wanted to achieve here is the creation of AWS instances that will automatically register with the Puppet Master and run their configuration with, as you should expect, zero input from admins. The old process would have involved logging in to the newly created server, downloading the puppet agent and config, and installing it, or a script at best. We can do better than that.

The Puppet Master needs to store agent binaries

To make setup of the agent easier we can store binaries of the agent installers for any OS or OS version that we are going to need. This can actually be done in the Puppet Master. We log in to the Puppet Enterprise console, and go to the Classification section. There will be some pre-defined groups done by the Puppet Enterprise installation. Expand “All Nodes”, then expand “PE Infrastructure”. Select the item “PE Master”. Now you are in the group definition, select the “classes” tab, which then should look similar to the following example:

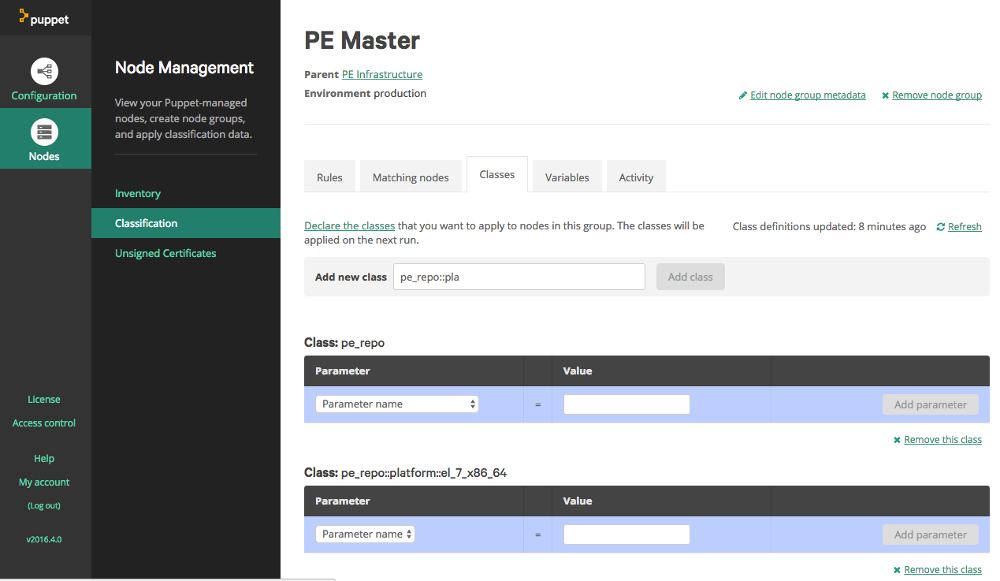
At this point you will see a list of classes already assigned to this group. In the “Add new class” textbox type ‘pe_repo::platform’, this should case an autocomplete popup to appear listing the possible classes:

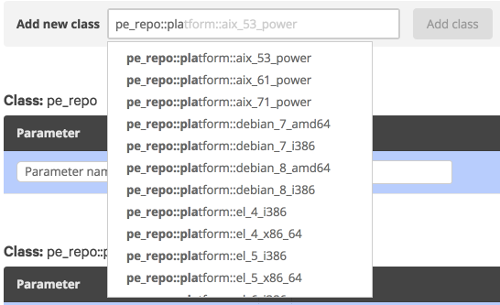
Find the entry for the OS and version you require, select it, and click “Add class”. At this point the Puppet Console will ask you to confirm changes. Once they are confirmed Puppet will run through the required processes, and download the agents, storing them locally.

Node Classification

Now whether we are assigning a role to a server via fact or we are using an External Node Classifier (ENC), a puppet node needs be to classified, so the server can determine what configuration manifests to generate and provide to the puppet agent. ( This step does assume you have configured branches in your control-repo for environments correctly). In this situation we are using Groups in the Puppet Enterprise console. A group has been created for each environment, with subgroups being created for each server role or type. The groups use facts to determine which servers belong in which group.

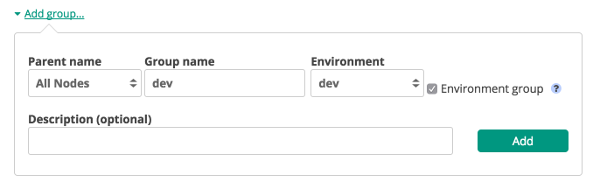
We login to our Puppet Management Console and go to the Node Management - Classification section. Click “Add Group” and input the required details. To make it easy the Group name and Environment should match the environment name used in the UserData example further on.

Once the group is created we click on it and start on the rules to classify nodes:

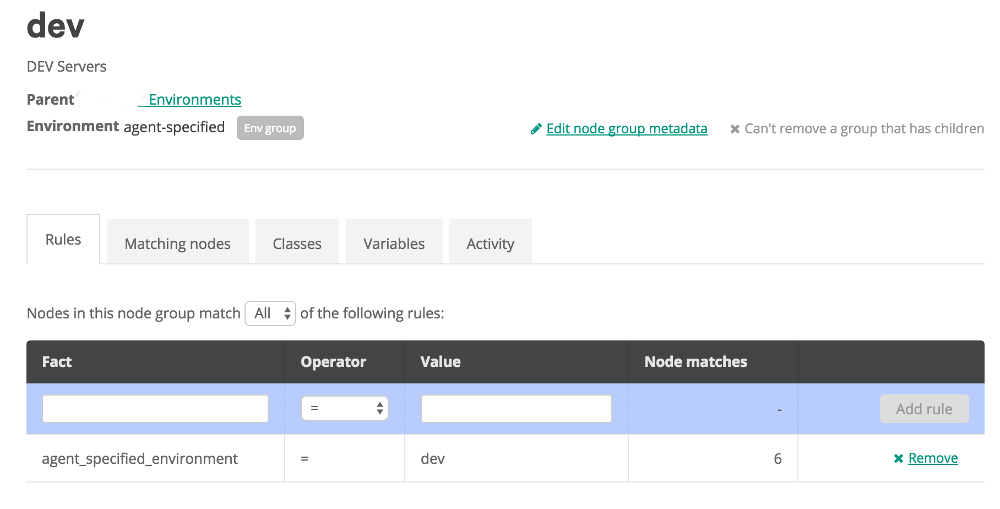
In the rules tab, we start by typing the fact name that we want in the the Textbox below fact. In this case it is “agent_specified_environment” as the agent is going to tell us what it belongs to. Then we select the Operator, with standard options like must equals, does not equal, and some various like options. Then we input the value we want the fact to be (or not be). Then click “Add Rule”. And apply the changes. At this point we can go to the classes tab to add items to this group, or create Subgroups for further detailed classification. The classes to add would be things like roles and profiles, which should be defined to do configuration on the agent for us.

Creating the Agent Node

Now we will move on to the actual creation of an EC2 instance and the configuration of the puppet agent. However you choose to create EC2 instances should work, as long as you have access to provide user_data. That is the key. To clarify, user_data is a set of commands or script that is run when the the instance starts up.

Most of my work is usually done in Ansible, but here I will show you a snippet of cloudformation template user_data:

UserData:
   Fn::Base64: !Sub |
      #!/bin/bash
      echo ${hostname}.localdomain > /etc/hostname
      sed -i '/HOSTNAME/c\HOSTNAME=${hostname}.localdomain' /etc/sysconfig/network
      echo preserve_hostname=true >> /etc/cloud/cloud.cfg
      curl -k https://puppet.localdomain:8140/packages/current/install.bash | sudo bash -s main:certname=${hostname}.localdomain main:server=puppet.localdomain custom_attributes:challengePassword=${puppet_challenge_password}
      systemctl stop puppet
      echo "environment = ${environment}" >> /etc/puppetlabs/puppet/puppet.conf
      echo -e "[agent]\npluginsync = true" >> puppet.conf
      mkdir -p /etc/puppetlabs/facter/facts.d
      echo "service=${service}" >> /etc/puppetlabs/facter/facts.d/facts.txt
      systemctl enable puppet
      sudo reboot

And to explain what is happening here: Lines 4,5 and 6 deal with setting the hostname of the server, and making it stick during start and stop processes. Usually I wouldn’t do this for dynamic EC2 instances, but for this environment it was required.

Line 7 downloads the puppet agent install script from the Puppet Master server and then runs it.

  • main:certname defines the name used in the certificate the puppet agent generates. The cert is what the agent and master use to identify it is a valid agent.
  • main:server defines the puppet master server fqdn the agent will connect to.
  • custom_attributes:challengePassword is a password configured in the master, that the agent will use to authenticate its registration.

Line 8 stops the puppet agent allowing us to do further config.

Line 9 sets the environment the agent will define itself as. This is used to help the Puppet Master classify the agent automatically.

Line 11 and 12, Sets custom facts for puppet to utilise. These facts are loaded by the agent and presented to the Master. They can then be used to further classify the agent, or be used as variables in manifest execution.

The new agent is then rebooted so ensure the new hostname and config are set.

Autosign or Challenge Password?

When we register agents there are a few options we can use. By default Puppet waits for an Admin to login and approve the registration. Thats far too manual however. We can also autosign registrations, so agents get added automatically, but we probably don’t want every agent that gets installed to add itself to the inventory. Every agent uses a puppet node entry from the license, either using them up, or costing more money. There is an option with autosign.conf to only approve agents with certain names in their fqdn. But that could still mean more registrations than we actuall want.

The last option is a challenge password. This blog explains the option quit well: https://danieldreier.github.io/autosign/. The process involes installing the correct gem on the Puppet Master and running through the config. During the process we specify a password. This is logged in the configuration, and then must be used when the Puppet agent creates its cert request (As shown in the userdata example above). The password allows the agent to authenticate with the Master. Allowing us to make our configuration process a little more secure.

Off and Running

Going through all those details above, we can now deploy an EC2 Instance and know that it will be configured without any hands on work. And it will continue to be managed by Puppet. Deployment and Config management handled automatically. That’s the whole premise of DevOps isn’t it. Hope you are all doing well. Hopefully the next blog post will be sooner rather than later.

So it’s been a while since my last update. I’ve been super busy on customer projects and deployments. There’s been some Architecture design and well as large scale implementation projects.

But the main awesome news and activities of the last month has been being able to participate in Amazon Web Services re:Invent 2016. It is the largest annual convention for AWS and takes place in Las Vegas, Nevada. It is full of keynote announcements, training sessions, hands-on labs, certification exams, and a vendor expo. It takes place over the course of a week, though the main conference is considered to be 2 days of the Wednesday and Thursday. Now many technical people across the globe will have blogged about all the specific technical announcements. I’ll hit some of them here, but the main point of this blog entry will be to try and describe the overall experience for someone who hasn’t been before. And maybe some tips to help navigate the chaos that is Vegas and re:Invent.

Planning what to see

Amazon always announces most of the courses and talks in a good timeframe before re:Invent is to take place. Much of the pre-set agenda is paid training courses. These are often quite good, but should be studied carefully as your choices should really take into account your experience level or job position, to get the best value out of them. Some are business oriented, and arranged more for project managers or sales partner teams. Others are much more technical, for AWS newbies, or very experienced users (from System Administrators to Developers).

Go through the schedule, find your budget, and book the courses you think will be good. They do fill up relatively fast. These courses are generally in high demand, so be quick.

Arrive the weekend before

To be able to take in the full amount of options and activities during the week, arrive early. The weekend before is a good idea. If you’re in a position like I am of being a consultant, it might be a combined training, sales, networking, certification week. It was going to be full-on. So we arrived in on the Sunday, and were able to get settled in about midday. So the afternoon was able to be about getting our bearings and sorting out where we needed to be an when. Fortunately our hotel was directly across the road from the main location for the conference. So a 5 minute walk and we could be there. Depending on where you are it could be a walk, or a taxi/uber ride.

A good plan if you get there in that weekend, is to get registration done on Sunday afternoon/evening. They open the venue and allow early registration pickup. Best to head along to this unless you want to be up super early on Monday. Your registration will get you the first bunch of swag. AWS participants this year got a nice hoodie, and an Amazon Echo Dot! Thats a mini version of the Echo running Alexa. About the size of a hockey puck, and should be interesting to play with (I haven’t really started yet)

Sunday evening we already had client dinners booked. So we were somewhat off and running getting business done.

The First 2 days

Monday and Tuesday was when my booked training sessions would be happening, and it’s best to get important training done on these 2 days, the rest of the week becomes more about announcements and tech. The sessions on these days may be part or full day events, running from 9 to 5, with a lunch break. Mine were full day events, so after grabbing breakfast I headed off for the courses.

My first session was the DevOps Certification Bootcamp. This is designed to run you through the items required for the AWS DevOps Certification. You are given an environment running CodeDeploy, CodePipeline and with access to a code respository. As the class progresses you perform lab tasks against this environment. Deploying a new application, upgrading the application, and performing a blue/green deployment between the 2 you now have. This is an excellent insight into these services and how to use them. I expect to do more study before I take the DevOps exam, but this was a good start.

Tuesdays session was the Cloud Transformation training. This is not a technical session, but more Project management or Project Lead oriented course. It was designed to run you through the process of arranging your organisation in readiness for moving your technology or I.T services to cloud providers. From organisational structure, to hiring skillsets, and identifying priorities and possible complications. I wasn’t sure this would be my thing, but being a consultant now and AWS partner, this ended up being quite useful. It’s likely I will end up needing to use the knowledge that came across here for future projects.

Just a quick note on meals. AWS provides a breakfast and lunch each day. A area of the location is set aside for the many many tables required to feed everyone. Try and get to breakfast around 7-7.30. It’s just before it gets busy.

Tuesday Night

After the important business of training, Tuesday night starts off the interesting events and probably introduces the stuff that might get you excited about re:Invent. First off, the Expo portion opens for an intro night. Vendors market their wares, other stands show future items coming, but it ends up being a mad rush for free swag. Tshirts were given away almost everywhere, and other cool items like drones were being raffled off. The only drawback here is that all the vendors will need to scan your badge, this is where the spam starts. If you are organised that’s not a big deal. It also may allow you to seen vendors that may be useful or interesting for you. I came across Fugue, Zerto, and Cloudcheckr (Though I use them already).

Also on Tuesday night is something that should not be missed. “Tuesday Night Live with James Hamilton”, as the title give it away it is presented by James Hamilton, a AWS VP and Distinguished Engineer. It’s a more technical session and he often goes through how AWS designs, implements, and operates at the scale it does. Providing stats about the insane growth they face every year. This year it involved a team from NASA describing how they use AWS for data analysis. As always re:Invent sessions are streamed and available online after the fact. Check it out if you are interested…

Wednesday

This starts re:Invent proper. The first item of the day (after breakfast at least), is the Keynote presented by Andy Jassy. The first day keynote starts of general and dives into infrastructure and platform services additions. New Compute instance sizes, storage options, new AI based services, and IoT options. Each item will be interesting to different people in different ways, but that’s just due to the large breadth of things you are able to do on the AWS platform.

Thursday morning also starts of with a Keynote, this time presented by Werner Vogels, the CTO Engineer Evangelist extraordinaire of AWS. This presentation went into how important strategy and agility is, not just for AWS, but for it’s customers as well, and really pushed the fast growing “Serverless” architecture movement. Then Werner went into more technical announcements of products, services, and features. A few items peaked my interest, Elastic GPUs, and AWS Systems Manager. At the end of his keynote Werner also always announces who the DJ is for the re:Play party, this year being Martin Garrix.

An important thing to note is as the keynotes happen, AWS releases updates to the agenda for the week. New talks about the services just announced will appear, keep tabs on the agenda and book the items you want. They will fill up very fast. The rest of these 2 days are open with many other sessions, labs, and certification opportunities. I was able to complete my SysOps certification on Wednesday, and took hands-on lab sessions on Thursday.

Thursday night re:Play!

Then there is the party. re:Play takes place in the evening after the rest of the day has finished. It’s huge, and has all kinds of things to do. Not only is there a big dance floor for the generally epic DJ sessions, but the bars are open all night, and there are many activities. This year there was a climbing wall, laser maze, dodgeball arena, and human foosball field. This is a great time to relax, most of the week is done, take it easy, mingle, and really try and take in the atmosphere.

Friday also continues the agenda with talks, but stops around 1pm. And depending on how much you got up to at the party, you may not want to attempt to much.

Networking

A large part of the overall convention is the networking opportunities. Whether it’s during lunch breaks, in sessions, or at the expo, you will have the chance to talk to other AWS employees and users. Everyone is there for the same reason, and at meals tables are often shared and you can strike up conversation with people from all over the globe. Sometimes in sessions you may be put into teams as well, which will often lead to you learning different perspectives.

Overall

As I had not been to a re:Invent before I thought this was a great experience, and highly recommend anyone go if they are using AWS. It may open up more possibilities on how you use the platform. You will meet many people, and be introduced to options you may not have seen before. Being it is Las Vegas it can be a bit of a sensory overload, it’s busy and there is constant light and noise all of the time. Make sure you organise leisure time every so often during the week (it’s Vegas, so there is plenty of non-work activities to break and do). I’ll leave you with an image of my downtime activities. I’m a speed freak so it was awesome. I will be back soon with more technical posts again. Hope you all are well, Christmas is coming, so make sure you take a break.

One thing that has become common in AWS usage is Assumed Roles. As an IAM user (or even other services), you are able to switch (or assume) roles in the AWS account, allowing you to change to a different set of access privileges. This becomes very useful when you are running multiple accounts. All IAM users can be setup in one account, but have the ability to assume roles in the other account(s). This means user credentials only need to be managed in one place, making overall admin more simple. Much of this is better explained in Amazon Docs or Other Blogs

Problem in Existing Automation:

Recently my company created some new AWS accounts and decided to move the lab environment to a new one. This meant we would no longer access the lab with direct credentials, but via an assumed role, with the included complexity of requiring MFA. I have a large repository of Ansible scripts, and unfortunately, they were designed to use default credentials setup in my AWS CLI. I have been working on solving this problem, and enabling my scripts to work with or without an assumed role based on variables I configure in files.

Setting up AWS CLI:

The first step is getting profiles setup in your AWS CLI config. This allows you to have multiple credentials ready for use in different accounts, but also allows profiles for assumed roles. In this example, my default profile is the main account where my user is (know as the jump account), and the lab profile is the account I will be assuming a role into (the destination account). The access key and secret key would be configured in the ~/.aws/credentials file under the profile [default]. The ~/.aws/config file should look like this:

The <assumed role> is the name of the role you need to be in the destination account. You or your AWS admin should have already set it up with the required permissions. The mfa_serial line is the value for the MFA device you have configured. It can be found in your user page in the AWS console. Now to test if that works. Grab a shell, and run (Enter an MFA token if you have that setup):

$ aws ec2 describe-instances --profile lab

You should get a json blob as a result of any ec2 instances running, or a response of “Reservations”:[] if nothing exists there.

Ansible and using the Security Token Service:

The AWS Security Token Service (STS) allows you to request temporary credentials to perform actions through the AWS API. We will need this to grab credentials for the lab account to create resources there.

We are going to create a basic playbook to create an EC2 Security Group that is capable of running directly or via STS credentials for a different account. The first thing we need to do is create a vars/default.yml file in our ansible directory, this will store some basic vars for this test playbook:

The next step is to create a vars/sts.yml. This will store vars needed to enable/disable the STS functionality, and the details needed to authenticate you. The values needed here are the same as what you will have placed in ~/.aws/config in the AWS CLI setup above.

Onto the playbook. It runs on the local machine where the playbook executes. And includes the 2 var files we just defined. Here’s a look before I describe it:

The first task uses sts_assume_role. This takes the default AWS credentials and variables, and requests temp credentials for the specified account/roles. Which it registers in variable assumed_role. The “when” command will only execute this task when the sts variable is true from the vars/sts.yml file.

The set_fact task takes the previously registered var, and retrieves the new credentials from the object. These values are then assigned to local vars for use in subsequent tasks and roles.

The last task is the actual creation of AWS resources. It could be any of the modules, but we will use ec2_group as an example. Here we take the newly set facts and use them to define aws_access_key, aws_secret_key and security_token. If we were to leave those lines out ansible would take our default credentials and attempt the resource creation with them. Likely that will result in authorisation, or missing resource problems. So we override the defaults with the new facts, forcing the task to connect to the API with the correct credentials. In this current form you would run the playbook like this:

$ ansible-playbook test.yml -e sts_mfatoken=123456 -vvvv

Which should result in the last couple of output lines looking like this, with a new security group in AWS:

PLAY RECAP *****************************************************
localhost : ok=3  changed=2  unreachable=0  failed=0

To MFA or not MFA:

Now MFA is always a good idea. And should be enabled on your IAM user account. But depending on your AWS accounts and trust configuration, you may or may not need MFA to assume roles. In my case MFA was required, so what you see in the examples above is what is needed to make the playbook work. This required the addition of the sts_mfa and sts_mfatoken vars. And the inclusion of “-e sts_mfatoken=123456” at the playbook runtime (with the number being the token from your mfa device). Otherwise you will end up with an authorisation error. If MFA is not a requirement, here are the modifications:

  • remove mfa_serial from ~/.aws/config
  • remove sts_mfa from vars/sts.yml
  • run the ansible playbook command without “-e sts_mfatoken=123456”

Without STS?

This playbook was also designed to run directly without needing to assume a role. In vars/sts.yml just change sts: true to sts: false. This will cause any tasks with the when: sts clause to be skipped as they do not pass the conditional check.

But what about the credential lines in the ec2_group task? Well, where I specify the variable value, I have added | default(omit). This means if those variables are undefined, the module execution with omit those arguments. Forcing the execution to pull the default values (which are my default credentials).

Thats it for now……

Well that was probably a rough blog post. It was a bit rushed due to the things I was working on. But hopefully it is helpful. I hadn’t been able to find any real world examples of sts_assume_role in use. I will be dropping back to some more “Getting Started with Tools” in the future. Let me know if this helped you, or any improvements that could be made. Till next time, Automate all the things…

I should welcome all you readers. I originally started this on my personal blog. But have decided to organise myself more and devote a specific blog to my technology work and learning. My original blog will stay as a personal project and thoughts output.

To give you some background, I started off in Information Technology as a basic level systems admin. Building servers and keeping office networks running. Through the years I have progressed through skills and seniority levels. Ending up team leading a group of sysadmins in the SaaS sector for a multinational enterprise. That lead me to my current focus.

These days I am a DevOps Engineer. There’s lots of debate into what DevOps is, but really it’s an evolution of things that have been done before, what is being done now, and what new technologies will come out of the industry. It’s the automation of systems building and management, the deployment of configuration and applications, and the ability to scale all of those systems and processes. Very much designing things to be as hands off as possible. If you are a systems admin that has scripted installs of servers or configurations, you have been doing DevOps. If you are a developer that has automated the testing and deployment of an application, you have been doing DevOps. And it progresses from there. Really there are many other places that probably define it better than I can. But it’s where I am now, and I quite enjoy the tech and the logistics behind designing and implementing things in this space.

The whole premise behind this, is designing a way that your systems, infrastructure or applications can be created as code. That way it can be version controlled for changes, and can be repeated quickly and reliably. Systems use to be built carefully and have a long-life, requiring long-term maintenance, which allows the possibility of config drift. That drift often being the bane of a support person. Now it is all about being able to destroy a problematic server and recreate it’s state quickly (usually minutes, maybe hours).

And what have I been doing? I have been upskilling in the processes and tools required to do all this. My ultimate goal would be to implement and run large scale infrastructure, that is in some ways self-healing and scalable.

Amazon Web Services(AWS) was my first point of learning (I started working with it a couple years ago though). The sheer breadth of services they can provide is impressive. Which is likely why companies like Netflix use them. You could build your entire infrastructure using them, and have pretty much everything you need. And if you don’t want to manage systems, they provide tools to deploy services and apps without having to know about servers or operating systems.

To orchestrate all my work I have been using Ansible and Puppet, (Ansible being the much preferred option for me). Both are a scripting frameworks to automate tasks and configurations. With an account from AWS, I could start out with nothing and build out a systems stack that an be deployed within minutes. And taken down just as fast.<

There are other tools out there like the previous mentioned that can so the same or similar things. It all comes down to your usage or business case. Generally picking them involves costs, and how easily they might be supported. But can be personal preference too. Don’t get caught up in trying to pick between them. A good understanding of your requirements will lead to the correct answer. In the future that may change, but that’s a step to be taken at a future time.

Now using all the great tools is one thing. But if things aren’t designed or planned correctly, it will still go horribly wrong. In days past an application was built and “thrown over the fence” to the Ops/Support team. Now it’s about understanding and planning the entire process from coding to deployment and management. A company is generally all working towards one goal. Therefore is a team and should work together. Fractures between internal teams can make things infinitely harder. So in the modern environment it is in everyones best interest to have all team members involved with support, or deployments. That way the end result is understood by all, and troubleshooting should be easier.

Thats probably enough rambling from me. I’m sure there are others than can go into more detail better than I can. I’m just trying to get better at what I do. I do hope what I end up putting here can help people out. And if someone provides info that I can learn from, all the better. Take care, and automate all the things.